Never lose another receipt
Get peace of mind. Just one lost receipt could cost you hundreds in lost tax deductions or missed reimbursements.
4.8

4.9
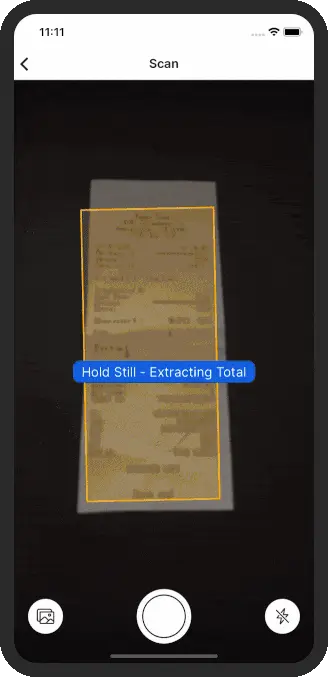
Receipt tracking made magical
Easy Expense has already found over $500 million in tax deductions and reimbursements.
Stay compliant & audit-ready
Turn your receipts into tax savings
- AI automatically labels the tax category, vendor, total, tax, date and payment method
- Smart capture automatically crops receipts
- Protect your data with automatic cloud backups


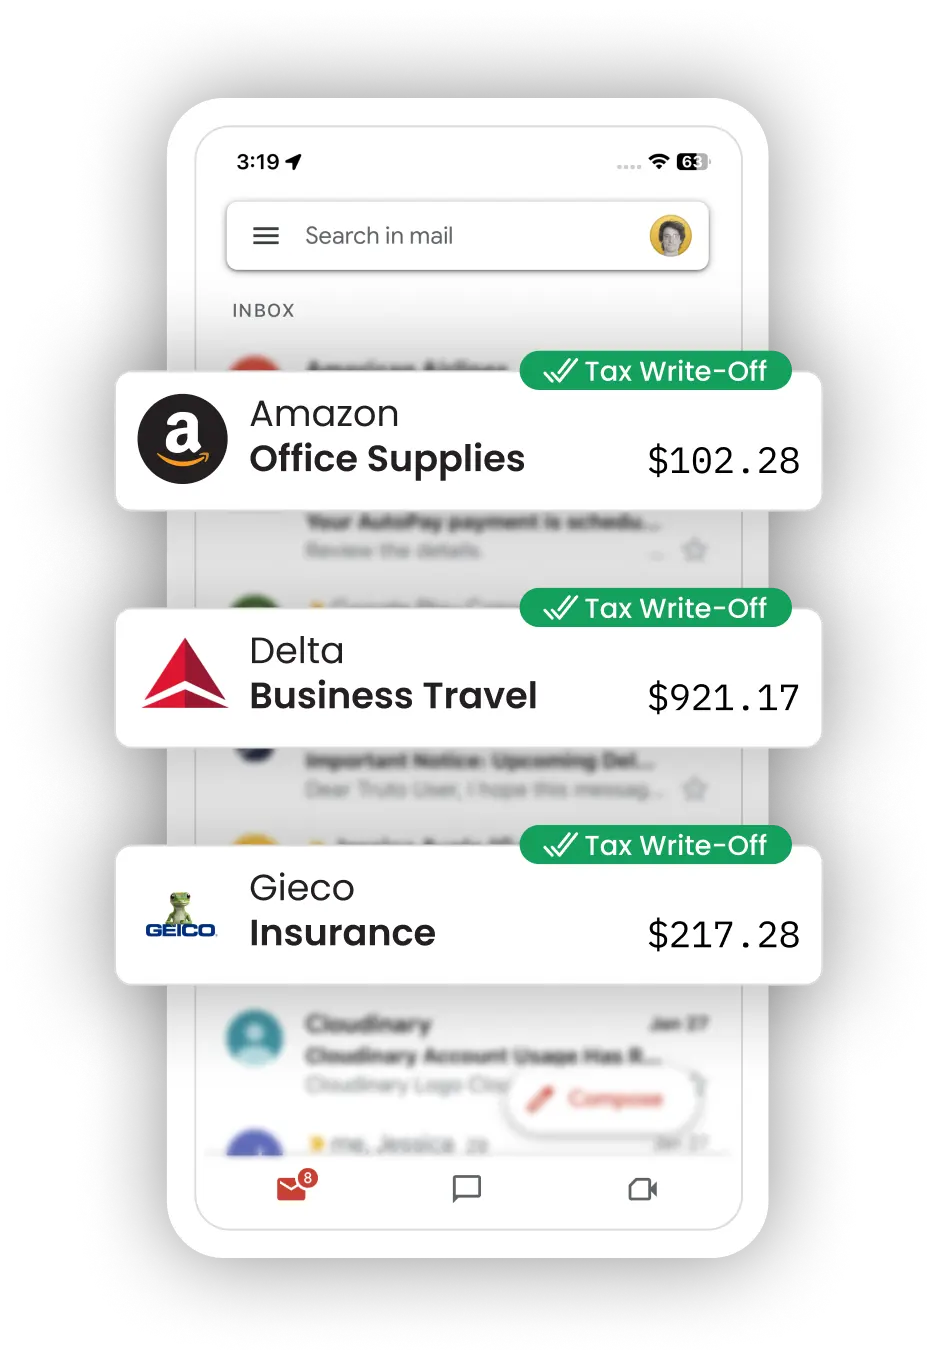
Organize your digital receipts
Automatically import email receipts
- Connect your Gmail account to auto scan for receipts
- Or forward receipts to upload@easy-expense.com

Automatic mileage tracker
Write off $0.73 per mile you drive
- Automatically track drives with GPS
- Save and classify trips in seconds
- Set custom mileage deduction rates


Never miss a deduction
Connect your accounts and find deductions
- Link your bank accounts, credit cards, or emails
- AI scans transactions and classifies tax deductions
- Save an average of $2,192 per year on taxes
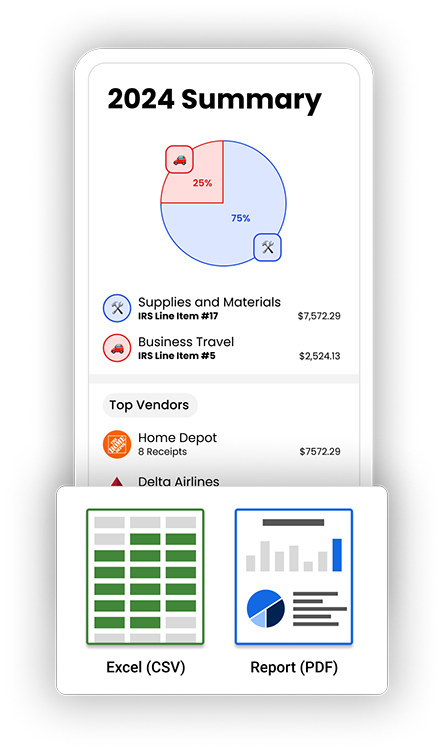
Professional PDF and Excel reports
Download reports at the tap of a button
- Summary reports that make filing taxes easy
- Create PDF expense reports for reimbursement
- Export your data to CSV or Excel
IT'S FAST AND SIMPLE
Our reviews speak for themselves
easy app to keep track of expenses

Osvaldo B.
Sep 15, 2025
Sep 15, 2025
This app is great! Easy to use, and
very accessible. I love the UX!

Krystal M.
Sep 21, 2025
Sep 21, 2025
So far so good, haven't used it to it's full potential but
love how it scans and records expenses.

Sydney A.
Aug 30, 2025
Aug 30, 2025
after MUCH research and trial of different products, we settled on this app.
not only is the interface very user-friendly and
easy to use, but the camera scanning and upload is simply SO
very fast and accurate

Brian E.
Apr 16, 2025
Apr 16, 2025
so far this is freaking easy to use. I've been taking my
time to file because of all the receipts. Now I wish I would have found this
sooner. a must have

Jared T.
May 21, 2025
May 21, 2025
so far this app is great! seems to work well with no glitches. I
love that I can add receipts that are texted to me, or a
paper copy. it really helps me not to miss recording my business expenses,
when I don't have a printer nearby.

Amanda J.
Apr 18, 2025
Apr 18, 2025
I'm a new business owner and my interactions with this app and the
customer service chat has been great! Very easy to use, take
pics of receipts and it automatically shows all things that are pertinent to
expenses!

Rick Y.
Sep 28, 2025
Sep 28, 2025
Tried many others, but this is the bomb. Auto scans and retrieves data from
receipts, and files into appropriate group so well. Well done on a great app
that is intuitive and so easy to use.

Tom C.
Nov 5, 2025
Nov 5, 2025
I was looking for a simple receipt scanning app and I tried several others,
but this app cuts them off in terms of simplicity. I like
this app and keep it simple.

Harpinder S.
Mar 22, 2025
Mar 22, 2025
great app to use I vouch for it. save me lots of paper work.

Leroi H.
Feb 2, 2025
Feb 2, 2025
So far, excellent! I only need fairly basic functions - receipt scanning,
email in. but the extra options like auto tracking mileage, the UI, the
categorisation have already made next year's
taxes more streamlined.

Odamtten
Jun 5, 2025
Jun 5, 2025
This is a great app for tracking expenses. Receipt scanning is very accurate
and a big time saver.

Randy G.
Mar 15, 2025
Mar 15, 2025
I have been using this app to help organize my expenses over a year now,
it's easy to use, the scan quality and picture quality
is very good.

Andrae W.
Nov 23, 2025
Nov 23, 2025
this is the app to have for keeping track of expenses. bank
reconciliation doesn't work with all banks but workaround is to upload
statements every month until it does.

Jordan H.
Apr 22, 2025
Apr 22, 2025
This is a great app! I would recommend this app to everyone. It is
easy to set up and to use
immediately. You will be happy with the app as I am.

Fly M.
Mar 31, 2025
Mar 31, 2025
I have two years using this app, so I can excellent for keeping my expenses
under control, scanning is so simple to use, it allow me to
download all data to sheets, among other useful tools,
highly recommended.

Elvis B.
Apr 6, 2025
Apr 6, 2025
I was looking for a simple receipt scanning app and I tried several others,
but this app cuts them off in terms of simplicity. I like
this app and keep it simple.
Harpinder S.
Mar 22, 2025
Mar 22, 2025
great app to use I voucher for it. save me lots of paper work.
Leroi H.
Feb 2, 2025
Feb 2, 2025
So far, excellent! I only need fairly basic functions - receipt scanning,
email in. but the extra options like auto tracking mileage, the UI, the
categorisation have already made next year's
taxes more streamlined.
Odamtten
Jun 5, 2025
Jun 5, 2025
This is a great app for tracking expenses. Receipt scanning is very accurate
and a big time saver.
Randy G.
Mar 15, 2025
Mar 15, 2025
I have been using this app to help organize my expenses over a year now,
it's easy to use, the scan quality and picture quality
is very good.
Andrae W.
Nov 23, 2025
Nov 23, 2025
this is the app to have for keeping track of expenses. bank
reconciliation doesn't work with all banks but workaround is to upload
statements every month until it does.
Jordan H.
Apr 22, 2025
Apr 22, 2025
This is a great app! I would recommend this app to everyone. It is
easy to set up and to use
immediately. You will be happy with the app as I am.
Fly M.
Mar 31, 2025
Mar 31, 2025
I have two years using this app, so I can excellent for keeping my expenses
under control, scanning is so simple to use, it allow me to
download all data to sheets, among other useful tools,
highly recommended.
Elvis B.
Apr 6, 2025
Apr 6, 2025
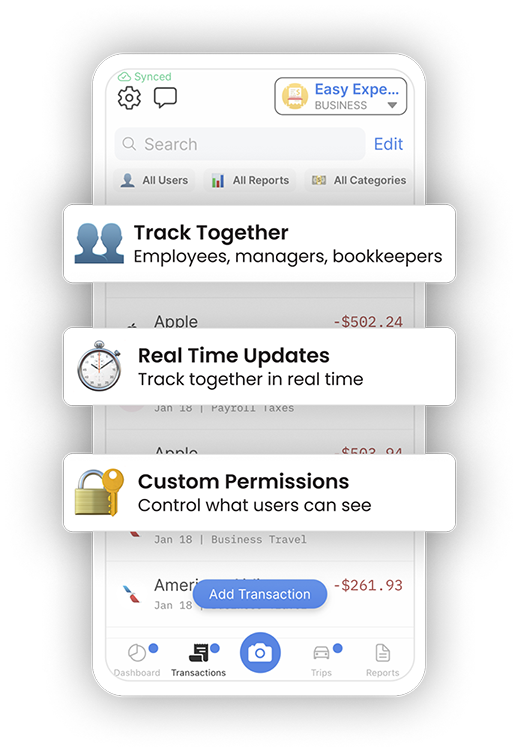
Easy Expense for Teams
Never chase your employees for another lost receipt again.
Learn More

Easy Onboarding. Invite users in just a few clicks.

Simple Billing. Guaranteed long-term pricing for your
business.

Expert help. Live in-app chat for your team and one-on-one
phone support.
Sep 15, 2025
Sep 21, 2025
Aug 30, 2025
Apr 16, 2025
May 21, 2025
Apr 18, 2025
Sep 28, 2025
Nov 5, 2025